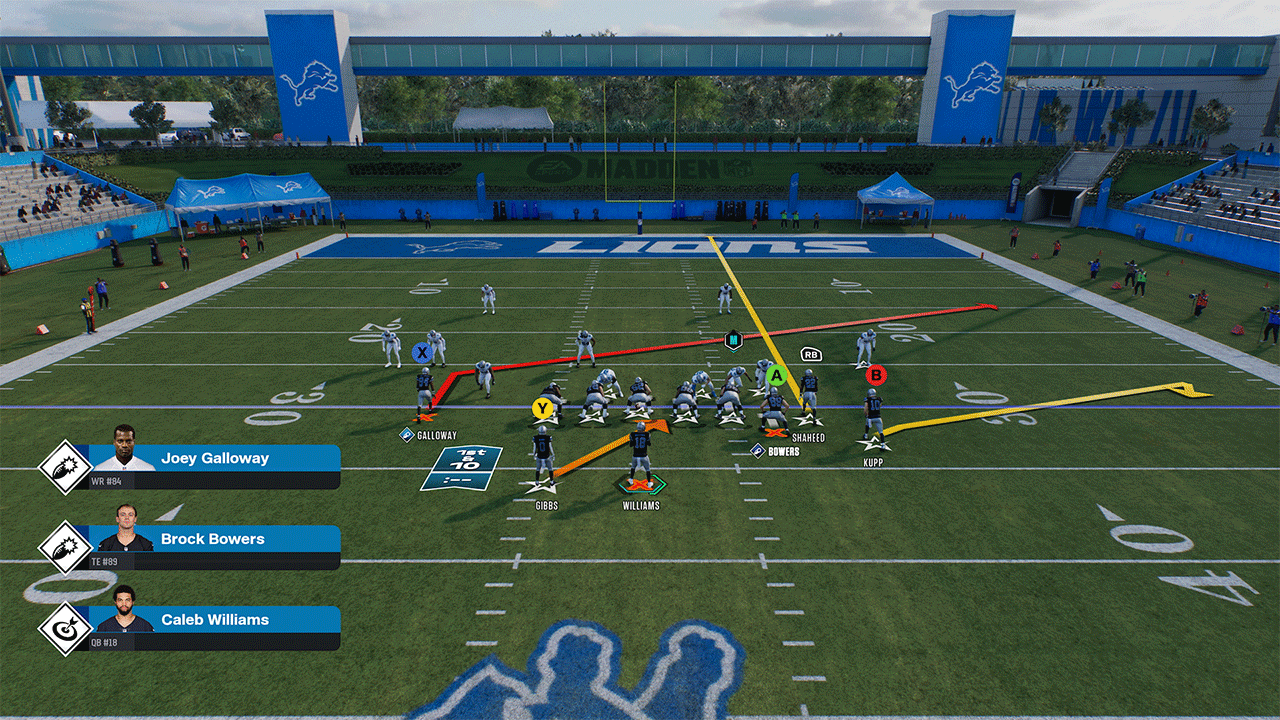
Set Up
- You can run this play totally Stock, or make the following adjustments
- Flat Outside Bunch WR
- Streak Point WR
This is some text inside of a div block.
BEATS:
This is some text inside of a div block.
Read Flat Route, then Streak, if you're running that set up. Feel free to just Hand Ball Off
Read Flat Route, then Streak, if you're running that set up. Feel free to just Hand Ball Off

Set Up
- Flat Route Iso WR
- Flat Route Outside WR
- Post Route Point WR & Custom Stem Down
This is some text inside of a div block.
-(1).png)
BEATS:
This is some text inside of a div block.
First, identify which half of the field you want to focus on. Then Read Flat, Seam Wheel, Middle Post on that side
First, identify which half of the field you want to focus on. Then Read Flat, Seam Wheel, Middle Post on that side
Set Up
- Block HB
- Streak Point WR
- Corner Route Outside Bunch WR & Custom Stem Down
- Wheel Route TE
This is some text inside of a div block.
-(1).png)
BEATS:
This is some text inside of a div block.
Quickly check TE Wheel in the Flat, then above it to see if Corner is getting open. If nothing, check Iso Drag
Quickly check TE Wheel in the Flat, then above it to see if Corner is getting open. If nothing, check Iso Drag
Set Up
- Streak Outside Bunch WR
- Custom Stem Point WR Down
- Return Iso WR
- Post Route TE
- Flat/Block HB
This is some text inside of a div block.
.png)
BEATS:
This is some text inside of a div block.
Bomb Play. Check Seam, but don't force it. If not there, work underneath High/Low between Post Route & Return Route
Bomb Play. Check Seam, but don't force it. If not there, work underneath High/Low between Post Route & Return Route
Set Up
- Slot Fade Iso WR
- Drag TE
- Return Route Outside WR
- Corner Route Outside WR & Custom Stem Down
This is some text inside of a div block.
.png)
BEATS:
This is some text inside of a div block.
Quickly check HB Flat, then TE Drag. If nothing, make Read between Post Route & Return Route
Quickly check HB Flat, then TE Drag. If nothing, make Read between Post Route & Return Route
Set Up
- Post TE
- Streak Iso WR
- Slot Fade Point WR
This is some text inside of a div block.

BEATS:
This is some text inside of a div block.
Check Bunch Side Sideline, and make a High/Low Read between Corner Route & HB. If nothing, work back to TE Post
Check Bunch Side Sideline, and make a High/Low Read between Corner Route & HB. If nothing, work back to TE Post
Set Up
- Return Route Outside Bunch WR
- Slot Fade Point WR
- Corner Route TE
- In Route Iso WR & Custom Stem Up
This is some text inside of a div block.
-(2).png)
BEATS:
This is some text inside of a div block.
Check our HB going to the Opposite Flat, if it's not there, then work the High Low between our Return & In Route. TE Corner Route is great for players who are good at Reading entire sides of the field quickly
Check our HB going to the Opposite Flat, if it's not there, then work the High Low between our Return & In Route. TE Corner Route is great for players who are good at Reading entire sides of the field quickly